Today I'm practicing TWO things: black & white (my first "published attempt" from my own photos) and the "mouse-over" trick from my Kinder egg post last week. So please bear with me.
(Wax on, wax off with your mouse to change from B&W to color)
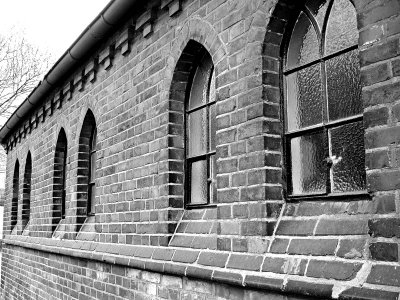
On the heels of my Scilla post yesterday, here's the little chapel that sits in the corner of that neighborhood cemetery here in Hannover. And since I've been musing about B&W photos for awhile now, I thought to myself, "This might make a good "project" for B&W."
Hmm. My nephew Paul had told me last New Year's in Michigan that I should NOT use the B&W setting on my camera if/whenever I wanted to take B&W pictures. I have since read enough t0 concur: there's much more "information" in color photos to manipulate for B&W in photo-shopping software.
So, with all due credit to Neil and Steve, whose blogs often explain what they're doing with their photos, here's my attempt at making my first B&W photo from color. I figured I had to bite the bullet sometime!
Wax on, wax off. (Surely y'all remember The Karate Kid?!) When I thought of that yesterday, I just about lost it, I was laughing so hard. Sometimes I amuse myself and it doesn't take much :)

love the mouse over trick. I need to learn that!
ReplyDeleteI think it's fantastic! You get a completely different feeling from the B&W pic than from the colour but both are lovely. Great choice of subject with all the shading and texture (no idea if those are photography terms!)
ReplyDeleteI've been meaning to try that trick for a while now but I'm afraid figuring it out might make my brain explode. :-)
Don't forget to charge up your batteries...
Mad: For you and anyone else who wants the HTML, here's the
ReplyDeletelink, thanks to Dixie Peach.
Christina: It took me awhile to figure out the HTML but once I did it, I now understand it. If I can figure it out, anyone can! Seriously. If you need help, I'll show you (yes, SHOW you :)
Are you kidding me! My camera is ALWAYS set to go!!!
Hi Ginnie - very nice photo - good for you that you're always trying something new photographically! And despite being a programmer/database guy for years (but not a 1st-class web programmer) - I *didn't* know that wax-on/wax off trick ;-) Thanks for the link. Also, I never saw Neil's website before - wonderful.
ReplyDeleteThanks also for your kind words of encouragement on my photos.
-- SteveR
Waxing didn't work at first but I finally got it! Cool effect!
ReplyDeleteHey Ginnie, that's really cool! I'll check out the link. I love your choice of subject. Amazing to see the differences you can create with "just" a chapel wall. Well done! :-)
ReplyDeleteSteve: So glad I could introduce you to Neil. That's the nice thing about blogging! And glad I could reciprocate with a "trick" for you :)
ReplyDeleteMei: Glad it finally worked for you. It IS a cool effect and it surprises me we don't see it more often!
CS: Thanks for the encouragement!
That "onmouseover" thing is a nice trick, and it even works in Internet Explorer! (Some of the cooler rollover effects on my blog only work in FireFox.)
ReplyDeleteIt does take a while for the colour image to load though, so maybe that's why mei shile couldn't get the waxing.
NIce job on the B&W version of that photo. Much to many people's surprise, making a B&W of a color photo is not as easy as clicking the "convert to grayscale" button in Photoshop. In fact, I don't spend enough time converting my images from color to B&W. But usually the much better way to do it is to use the Channel Mixer adjustment layer and set it to monocrome. Another way to try is use a Gradient Map adjustment layer (with B&W gradient chosen).
ReplyDeleteI've uploaded some examples of what I'm talking about.
What was the process on your photo? Please do tell.
Hey Ginnie I love it and yes you are correct about the hint. I've been given that tip too, easier to use color to go to black and white... Oh - if you go back to my tips on my photo class, there was a big one there on that for using adobe...
ReplyDeleteClass was April 9 - so it would be on a 10th post...
Gustav: "Drastical" is a good word! I love it :)
ReplyDeleteGary: Wow. Glad you reminded me of IE because half the time I don't check to see if it works, since I use FireFox. Thanks for mentioning that it might be slow.
Paul: Since you asked, I used one of Scott Kelby's techniques for PhotoShop CS2:
Press letter D to set foreground color to black.
From Create New Adj. Layer, choose Gradient Map. Then click OK.
From Create New Adj. Layer choose Channel Mixer and click on Monochrome. Lower Contrast slider to -8; lower Red channel to 75%; Move Green to 26%; Move Blue to 34%.
Under Filter, Sharpen, Unsharp Mask, set Amount to 85%, Radius to 1px, Threshold to 4 levels.
Like I said, since you asked! I loved seeing the different examples of your kids--the 2 oldest kids, that is. BTW, Paul, my nephew in Michigan, is the proud papa from last week of little Aden James. Congratulations again!
ET: Yours was one of the posts that concurred! So I'm a happy camper all around :)
Thank you for sharing these good tips for B&W! I will definitely look into them. I love the photo you used, both ways.
ReplyDeleteOk, so he's using channel mixer/monochrome, like one of my examples. But he's got some "default" settings for the color channels. I just did the PS default settings.
ReplyDeleteWhat would be interesting would be to try learning what other settings or tweaks you could make to a specific photo. Not every photo is the same.
Ruth: Thanks!
ReplyDeletePaul: Yes. But this is only one of 4 techniques he uses for B&W. I just did another photo using the same technique as today and did change the color channels a bit becaue his didn't work as well. They did seem to work well on this post's photo, though.
I love this, Ginnie! What a great effect.
ReplyDeleteDoesn't doing the mouse over trick make you feel oh-so-clever? ;)
Hi Ginnie, very nice work and really pleased to see you getting into some B&W :) The roll over trick is great with the mouse, i might have to look into that myself. Sorry it took me a while to reply here bit i've just been away in the italian speaking part of Swizterland for a couple of days. Took lots of photos :) Thanks for the mention. Hope you tried my method too, but as you say there are many ways to do this and each has it's attraction. Looking forward to seeing more.
ReplyDeleteBest wishes from Switzerland
Neil
Dixie: YES, thanks to YOU! See what you started!!
ReplyDeleteNeil: Thanks for your vote of confidence. I think I tried your way awhile back but there was something lost in the translation, as I recall. Some of the words were in German and not related to CS2. But I'll look again, in case it makes sense now. One of these days I hope to make it to Switzerland!
Mr. Fab: I'm like you in that it doesn't take much at all :)
I knew this html from Gary and web-pix...But did not tried it yet. Seeing it on your blog ..... You inspire me! This is too cool! And you ar the cooooolest! Heh heh!
ReplyDeleteAwww, MP. Nothing can be quite as cool as what YOU do on your site, but thanks anyway. This trick has really been fun...and useful, I might add.
ReplyDelete